by Better Homes & Gardens
Instructions - Make your own kitchen island with this easy, do-it-yourself project.
All words & photos in this article belong to Better Homes & Gardens
Tools
- tape rule
- circular saw
(optional)
- straightedge (optional)
- fine-grit sandpaper
- paint brushes
- stencil
- sea sponge
- rag
Materials
- two matching dressers
- one quart latex primer
- one gallon semigloss latex paint
- stencil spray adhesive
- black crafts paint
- solid-core slab door, 36 inches wide
- one quart wood stain (we used a translucent white stain
)
- polyurethane sealer
- construction adhesive
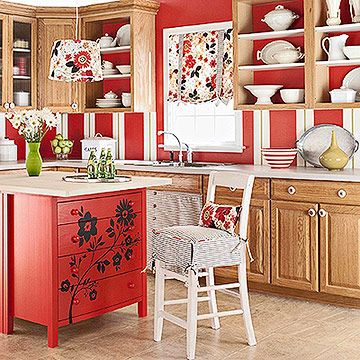
- Because we wanted the finished island to be 36 inches tall, the same height as the perimeter countertops, we used a circular saw to shorten each dresser leg by 2 1/4 inches and sanded any rough edges. If you prefer a taller work surface, skip this step. Prime the dressers, allow to dry, then paint and let dry. Apply a second coat of paint and let dry.
- Make the stencil, using instructions below. Spray the stencil with adhesive, and attach it across the drawer fronts. Dab the sea sponge in the crafts paint, blot a few times on a rag, and pounce the paint on the stencil. Remove the stencil and let dry. Repeat on the other dresser, if desired. Attach the drawer knobs.
- We trimmed the door to 45 inches tall and sanded the cut side. If you prefer a longer island, leave the door untrimmed. Apply the stain and let dry. Brush on polyurethane sealer (we used matte finish) and let dry. Repeat and let dry. Apply at least two coats; add more if desired.
- Position the dressers as desired, and use the construction adhesive to attach the door to the dressers.
Tips & Tricks
- Place bricks or other heavy items on top to clamp the assembly while the adhesive cures overnight.
- Alternately, attach the door with screws driven from underneath or use L-shape brackets attached to the sides of the dresser for easier dis-assembly later, should you want to move the island.
Make the Stencil
- Enlarge the pattern to 400 percent and cut your stencil from transparent stencil plastic. Use a sharp crafts knife, and turn the plastic as you cut rather than turning the knife.
- Note: Cut out the centers of the flowers as desired, and save the pieces. Attach them to the dresser with stencil adhesive before you paint the stencil.
All words & photos in this article belong to Better Homes & Gardens
No comments:
Post a Comment